Detecting objects using Custom Vision service
Last year, I had a chance to participate in a project that we developed together with InDro Robotics team. Our primary goal was to build a machine learning solution that could be used to rescue people on the water. Just imagine an army of drones that can fly under the ocean and notify the rescue service once any issue is recognized. You can find more details about the project in the following articles:
https://blogs.technet.microsoft.com/canitpro/2017/05/10/teaching-drones-to-aid-search-and-rescue-efforts-via-cognitive-services/
https://enterprise.microsoft.com/en-ca/customer-story/industries/public-sector/public-safety-national-security/indro-robotics-revolutionizes-search-rescue/
Working at this project we could build our own model using [CNTK] (https://www.microsoft.com/en-us/cognitive-toolkit/) as well as use a private preview of Custom Vision cognitive service that was moved to public preview shortly after we finish our project.
At that time the Custom Vision service could just classify images rather than detect or identify a particular object. Additionally, there were some requirements regarding to image background and the object appearance, but we found that the service worked pretty well in a “closed” environment like ocean where we have the same background. It could classify images even better than our custom model.
The most important challenge there was inability to build custom rules using the service. For example, the service could return that there is a life-vest and a boat on an image, but it was not clear if we have a life-vest on the boat or in the water. In the first case there is nothing strange, but the second one requires an operator attention (probably, something happened to the boat and people are floating around – you might watch Titanic to encourage your imagination there😊).
But it was exactly one year ago. Since that time Microsoft added some cool features to the service including object detection features. So, I decided to find some images from our InDro project and see how it works.
To start working with Custom Vision service you need to login to https://www.customvision.ai portal and sign-in using any Microsoft ID account. No Azure Trial or credit card are required – just login and start create a new project.
Custom Vision supports great API and some SDKs for different programming languages. For example, there is C# and Python tutorials that you can use to create a project, upload images, train your model and make predictions programmatically, but for this short experiment I decided to use just the portal. So, to create a project just click New Project button and activate the dialog below:

If you already have experience with Custom Vision, you will be able to see a new option Object Detection there. It’s exactly what we need to use: just choose Object Detection and upload some images using interface.
Because we are not classifying images anymore but detecting particular objects we need to provide more information about our objects tagging them. It’s possible to do directly on the portal. You can filter all untagged images and provide tags one by one:
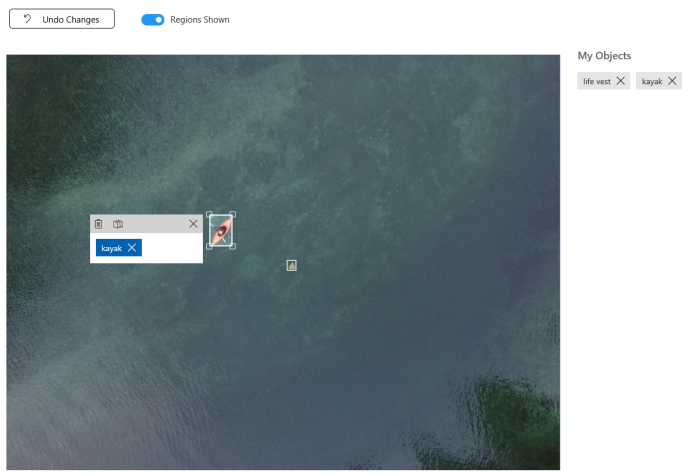
This is the most complex step, but the Custom Vision service can start building a model once you have at least 15 tagged objects per tag. So, you can use few images only.
In my case, I uploaded 28 images with 25 kayaks and 17 life-vests there. I had much more images (of course, more is better), but I wanted to see results for a small subset. So, I clicked Train button and got my model in 60 seconds. The result is very surprised me:
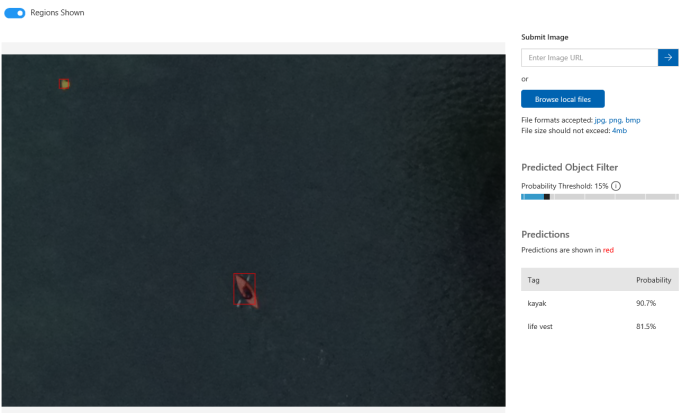
I even could find a life-vest that I could not recognize like a life-vest myself:

Of course, there are some room for improvement. For example, you can upload more images per tag as well as answer some questions like if you want to recognize a life-vest that is on a person who is sitting in a kayak. But even on the first iteration the service produces good results and you should not be an expert in Machine Learning.
One more thing that I want to note is how to start working with Custom Vision programmatically. In the beginning I mentioned couple tutorials, but all of them assume that you already have prepared images with marked boxes. So, you need a tool that helps you generate your dataset in the right format. And there is a tool: https://github.com/Microsoft/VoTT. Initially this tool was built for CNTK, but now it supports YOLO format, TensorFlow Pascal VOC and Custom Vision. In the case of Custom Vision, the tool will create a new project and upload all images, tags and boxes there.
Pay attention that for Custom Vision export you need to provide a training key rather than a directory:

Your training and prediction keys are available on customvision.ai. Just click the Settings button in top-right corner of the portal.
If you want to use existing project some JavaScript coding skills are required. The Visual Object Tagging Tool is open source. So, you can simply find the following file lib/detection_algorithms/custom_vision/exporter.js and modify it a little bit (check vott_export name and tag creation procedure).


Great post, thanks! I also posted some code to upload multiple images at once into Custom Vision – actually for an object classification problem but you can easily adapt it for object recognition. Maybe it can be useful to you. https://github.com/CaronteDemonio/CustomVisionAPI
Marco Agnoli
07/12/2018 at 10:39 AM