Archive for August 2017
How to cook Azure Mobile Apps (node.js): Xamarin and .NET Standard
In the previous post we discussed how to setup Mobile Apps in node.js, and it’s time to start developing a simple client application. I will use Xamarin and C# programming language, because Xamarin is the coolest technology right now that allows me to develop applications for all modern devices.
My application is not very complex, so, I will use Xamarin forms to develop it just once for all platforms not digging to any platform specific features.
You can create your application on Mac or Windows using Visual Studio for Mac or Visual Studio 2017 (2015). In my case I am sitting at Kelowna airport with my Windows computer, so, I will use Visual Studio 2017 Update 3.
Pay attention that Visual Studio allows you to create Xamarin Forms application using Shared Project or PCL templates. It’s strange, but Shared Project is the default option, and I would like to recommend changing it to PCL. Later, you will be able to use .NET Standard rather than PCL just moving your code to a .NET Standard library project.
Visual Studio creates 4 projects in one solution and three of these projects contain platform-specific code for supported platforms (iOS, Android and UWP), but the last one is exactly Xamarin.Forms based portable class library. Almost all time we will work with this library, but on the first step we need to add a reference to Mobile Apps SDK for each of our projects. Therefore, I would recommend to select Manage NuGet Packages for the solution rather than for a particular project and find Microsoft.Azure.Mobile.Client library:
The process is not complicated, but there is a surprise: we will not be able to install the latest version of the library exactly to Xamarin.Forms project:
The latest version supports .NET Standard (at least 1.4) and we can easy add it to our Android, iOS or UWP applications (because Xamarin added support for it some time ago), but you cannot add it to your PCL (Xamarin.Forms part). Of course, you can say that I could avoid this problem using Shared Project approach. Yes, I could do it as well as I could create lots of “spaghetti” #if #else code and got a problem with IntelliSense and so on, but I want to stay with “a separate library” approach and there are several ways to fix the problem:
· I will start with some suicidal ways like: you can use REST API directly. It’s really great way to increase your income if anybody pays you for number of code lines, but in my case, it’s not true;
· Some guys like to recommend using the previous version of the library. Talking about “previous” they tell about 3.0.1 that was published couple versions ago. I am not sure what there is changed since 3.0.1, but I believe that they didn’t publish new couple versions “just because”. That’s why I would not recommend using this approach as well;
· Finally, you can migrate your library to .NET Standard;
Let’s stay with the last approach and see, how we can make the migration.
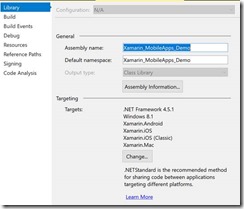
It’s funny, but you could do the migration process just clicking a button. Using Visual Studio 2017 Update 3 I could not find any button. If you visit PCL project settings, you still will be able to select a profile for PCL and you will see a message about .NET Standard benefits, but the button is disappeared. Probably, it was a reason to do that. At the same time, I am sure that yesterday I could see the button in Visual Studio for Mac.
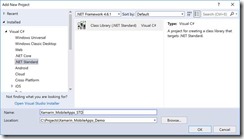
Because we don’t have any button, we need to create one more project based on .NET Standard library template manually:
Opening project settings you can select any .NET Standard version for the project. Just pay attention that Visual Studio 2017 Update 3 will not install .NET Standard 2.0 automatically and you will need to install it manually from Microsoft web site, but Update 4 installer should include 2.0 version.
But don’t be in a hurry because .NET Standard 2.0 is just released, and it will be supported by Xamarin in next major update only. In fact, the problem even is not Xamarin, but in UWP platform that works based .NET Standard 1.4. You can find this information looking at the following page: https://docs.microsoft.com/en-us/dotnet/standard/net-standard
Microsoft is going to support .NET Framework 2.0 for UWP projects since Fall Creators Update, but it doesn’t mean that you will be able to target .NET Standard 2.0 and earlier UWP releases at the same time.
Therefore, if you want to avoid any previews, alfas and insider releases at this time, you need to stay with .NET Standard 1.4, at least for next couple months.
Once the project is created, we can move all our files from Xamarin.Forms PCL project to .NET Standard library project and remove initial Class1.cs. Thanks to Galaxy you can use Drag and Drop to copy all your files and folders. So, if you already have lots of files in the PCL, it should not be challenging.
Now, it’s time to remove your PCL, and you can rename your .NET Standard library using “old” PCL name. It will not help you to avoid problems with dependencies for your iOS, Android and UWP projects, and you should target your .net standard library from each of them.
The last thing that we need to do is adding reference to Microsoft.Azure.Mobile.Client and Xamarin.Forms libraries. The first package will not generate any problems this time, but I cannot say the same about the second one. Xamarin.Forms 2.3.4 still is not .NET Standard library.
Of course, the next release (2.3.5) already supports .NET Standard, but it’s still in preview. At the same time, if you want to test new features, you can check “Include prereleases” box in NuGet package manager and use a prerelease for 2.3.5 or even 2.4.0.
Both releases support .NET Standard, but the second one supports even .NET Standard 2.0. But if you want to use .NET Standard 2.0 for all projects, including UWP, you will need to install Visual Studio 2017 Update 4 Preview, the latest Windows 10 Insider Preview and the latest UWP SDK insider preview. I can use both options on my computer, but today we are working with components that are in production right now. So, we need to think about how to use the current Xamarin.Forms release.
It’s not the biggest problem because .NET Standard supports type forwarding and other stuff to target old libraries and we can use Xamarin.Forms, but we need to make some modifications in our project file: just open your .csproj for editing and add <PackageTargetFallback>portable-net45+win8+wpa81+wp8</PackageTargetFallback> right after TargetFramework:
It will tell the compiler that if it cannot add a reference due to a problem with the target platform, it’s OK and it should be ignored.
That’s all. Now, we can recompile our solution and even start initial projects using real devices or emulators.
Of course, once a new version of Xamarin.Forms is released, we will be able to use it as a .NET Standard library, but the previous approach will work fine for any other PCL assembly. Counting that there are huge number of existing PCLs, it’s important to know how to use them.
One more thing. If you still targeting Silverlight (WP) using Xamarin, you may need to add a special library to enable compatibility for it:
Next time we are going to start using our Mobile Apps and we will discuss lazy loading and 50 records limit.
How to cook Mobile Apps (node.js): table schemas, primary keys and existing tables
In this post I am going to discuss how to start developing a Xamarin client application that should be connected to an existing database. As a backend I am going to use Azure Mobile Apps, because the service can minimize our work on server side and provides lots of useful features. But to get all benefits from the service, you need to know some tricks that it’s not easy to find in standard tutorials.
Today, I am going to discuss, how to use Mobile Apps in the case if you already have a database. Yes, Mobile App allows you to create a database from scratch using a graphical interface, but usually it’s not the case. I participated in lots of projects last year, and we always had a database in advance or designed it a few days before any client application. I know, it can hurt some client developers, but in many cases Xamarin app is not the centerpiece of your project.
Before to create any database, I want to note couple things.
First, you can develop your code for Mobile Apps in JavaScript or in C#. I like C# and don’t like JavaScript, but in the case of JavaScript/node.js implementation, you should do/know almost nothing to implement your backend. In the case of C#, you will need to generate lots of code, know Entity Framework details, and Azure Portal will provide limited number of features. In fact, C# and node.js implementations are fully different and if I don’t need to create a complex enterprise application I will always select node.js. If you want to use C# rather than JavaScript, this post will not be useful for you at all.
Second, Microsoft still supports an old implementation of the mobile backend called Azure Mobile Service. It’s not available in the new Azure portal, but there are still lots of content about it. I found that some developers continue to use Mobile Service term and it generates some messy. Try to use Mobile App everywhere. It’s the latest implementation under Azure App Service umbrella.
Ok. Let’s try to create a new database using SQL Azure. In order to have some tables and data, I would recommend selecting AdventureWorkLT database. It’s possible to do from the Azure portal. So, you can simple select New->Databases->SQL Database, and you will be able to select the database from the “select source” field in the wizard:
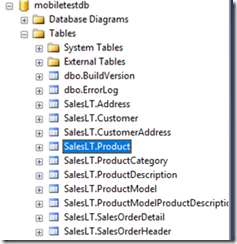
Once you create your database, add a firewall rule to connect it from your SQL Management Studio or Visual Studio, you can note two things there:
-
There are several schemas rather than just dbo one. It’s very important, because dbo is the default schema in Mobile Apps, and if we want to get some data from SalesLT.Product table, we have to deal with SalesLT schema;
-
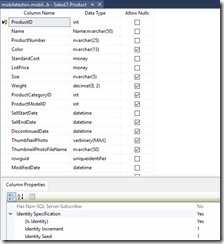
You can note that all tables contain primary keys of the int data type. In the case of the Product table we have ProductID as the key. It’s a very important note because some people likes to tell that you have to use guid as a data type for keys. I don’t think so, but we even should not discuss this question since we ALREADY HAVE a database that was designed by Microsoft as an example. I just want to connect my Xamarin app to it.
That’s all with the database and now we can create an instance of Mobile App:
It’s a trivial task and you should not select any specific parameters on this step.
Once you have your database and an instance of Mobile App, you can connect it together. To do it, you need to open Data Connections tab from the Mobile App dashboard and add a new connection:
Azure portal is clever enough to list your database. So, you should not provide any connection strings manually. You can see that a default name for the connection string is MS_TableConnectionString. DON’T TOUCH IT! Exactly this name is hardcoded in many places.
In fact, using Add data connection tab, you are creating a new connection string that is available from the Application Settings tab. Therefore, Data Connections tab is just an easier way to create MS_TableConnectionString parameter, but you can use Application Settings as well and we are going to use this tab for some additional parameters:
Now, it’s time to select a programming language. In the case of C#, you can close the portal and just create all code in Visual Studio, but in our case, we want to use the portal and node.js. So, we have to initialize our empty hosting space with the right environment. It’s possible to do if you select Easy Tables tab:
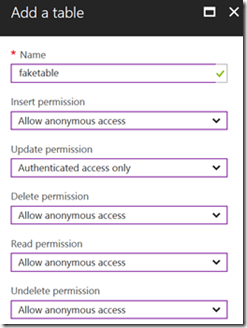
Just click Initialize App and all needed components will be installed to your hosting space. Now, Easy Tables tab allows you to create new tables in the existing database and you can note that it doesn’t display our existing tables. Let’s try to understand, how to show our SalesLT.Product table in the list. To do it, I will just create a new table and check what is happening with my hosting space:
To create a new table, you can provide a table name and some security parameters for different operations with the table.
Now, you can use Mobile App dashboard to open App Service Editor to review all available code in your hosting space:
You can see that for our faketable we have two files faketable.js and faketable.json. The first file imports azure-mobile-apps module and creates a table object, and the second one contains some parameters for the table:
{
"softDelete" : true,
"autoIncrement": false,
"insert": {
"access": "anonymous"
},
"update": {
"access": "authenticated"
},
"delete": {
"access": "anonymous"
},
"read": {
"access": "anonymous"
},
"undelete": {
"access": "anonymous"
}}
Both files contain important information for our research. Now, we can see that there is a module that contains implementation for the backend, and if we check the module, we can find it on github: https://github.com/Azure/azure-mobile-apps-node. So, node.js implementation for Azure Mobile Apps IS IN OPEN-SOURCE. It’s great because we can find some answers there. The second file allows us to tune the backend behavior a little bit providing some parameters per table.
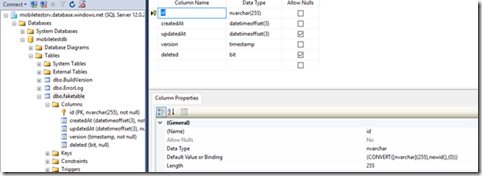
In fact, in order to connect a table to our service from our database, we need to create these two files. Let’s make the experiment and create product.json and product.js files with the same content as faketable.js and faketable.json. Of course, if you go back to Easy Table, you will not be able to see any Product table due to some problems. In order to understand all these problems let’s look at faketable structure:
You can see that the backend created five columns for the table and the table was created in the dbo schema. So, to make our table available we have to manage several things:
-
Table schema
-
Additional columns
-
Primary key that is GUID rather than int
In the case of columns createdAt, updatedAt, version and deleted you should nor care too much. Once we fix all other problems, the framework will add all columns automatically and we will not loose our existing data. Of course, if you suddenly have some columns with the same names, you are in trouble, but it’s a very rare case.
Let’s fix the table schema. In our case we have SalesLT rather than dbo. To understand how to change the table schema for all tables, I would recommend to open node.js implementation on github: https://github.com/Azure/azure-mobile-apps-node. You can open environment.js in src/configuration/from subfolder and check all available parameters there. One of the parameters is MS_TableSchema that you can provide from the Application Settings tab on Azure portal.
* @param {string} MS_TableSchema Default schema name for sql tables. Can override in table config
Therefore, we can specify SalesLT schema for the project.
Now, you should be able to see Product table in the list, but it will not work due to the problem with the key. By default the key is GUID, but in our case it’s int and we are not going to change it because it will lead to huge amount of problems. In fact, Mobile Apps allow us to use int, but we need to configure it. In order to understand where to make all needed changes, I would recommend to check /src/data/mssql/statements/createTable.js on github. There is some code:
pkType = tableConfig.autoIncrement ? 'INT' :
It’s just the beginning of the line, but you can see that this line is setting up the primary key type. It’s clear that it will be int if autoIncrement property from Product.json is true.
Therefore, we fixed almost all problems, but we still have one left: the primary key MUST have “id” name. If you open src/data/mssql/statements/insert.js on github, you can find something like this:
sql += util.format('SELECT * FROM %s WHERE [id] = SCOPE_IDENTITY()', tableName);
You can see that id is hardcoded inside the query. I really don’t know why it was implemented in this way, but it’s something that you cannot modify it in any config file. Of course, it’s possible to assign own commands, but I am not sure if you want to implement own data provider. Additionally, it’s possible to modify existing code and redeploy it, but it’s not easy as well. The fastest way to fix the problem, it’s renaming our ProductId to id:
EXEC sp_rename 'SalesLT.Product.ProductID', 'id', 'COLUMN';
It’s not the best way, because you have to check all your stored procedures, modules and other client applications. So, it will not work in enterprise.
Now you can use Easy Tables to see all data, and all additional columns will be created.
That’s all for today and next time we will discuss how to develop a basic Xamarin application, but there are still some things to research, which you can do yourselves: find a way to work with app.js in order to use more parameters (including schema); try to understand if it’s possible to modify table schema per table (schema parameter in table config file); how to modify the code to use any primary key name.


