Windows ML: using ONNX models on the edge
Source Code for this example is available on GitHub: https://github.com/sbaidachni/uwp_onnx_example
Open Neural Network Exchange (ONNX) is a new open-source project that should help people to use neural network models across different machine learning frameworks. Microsoft started to talk about ONNX just last October, but frameworks like CNTK, Caffe2, PyTorch already support it and there are lots of converters for existing models including a converter for TensorFlow. Additionally, Microsoft included ONNX support to Universal Windows Platform, and it’s exactly that what I am going to discuss today.
To create a basic UWP application I need a model first. It’s possible to download an existing ONNX model from the following repository, but I decided to train my own model. Right now, we are doing a series of Machine Learning OpenHacks where people have to pass some challenges and learn lots of stuff about different machine learnings frameworks and algorithms. The simplest challenge in the list is creating a classification model using Microsoft Custom Vision Cognitive Service. Usually cognitive services don’t allow you to download your trained models, but Custom Vision does!
If you want to create an exportable model the Custom Vision service provides three options that are marked as compact. For my experiment I selected just General one:

Our OpenHack dataset contains thousand images, but Custom Vision can be trained even if you have just 5 images per category. I picked two categories from the dataset: hardshell jackets and insulated jackets and uploaded 60 images per category. If you want to create a model yourself, you will be able to find all initial images on github.
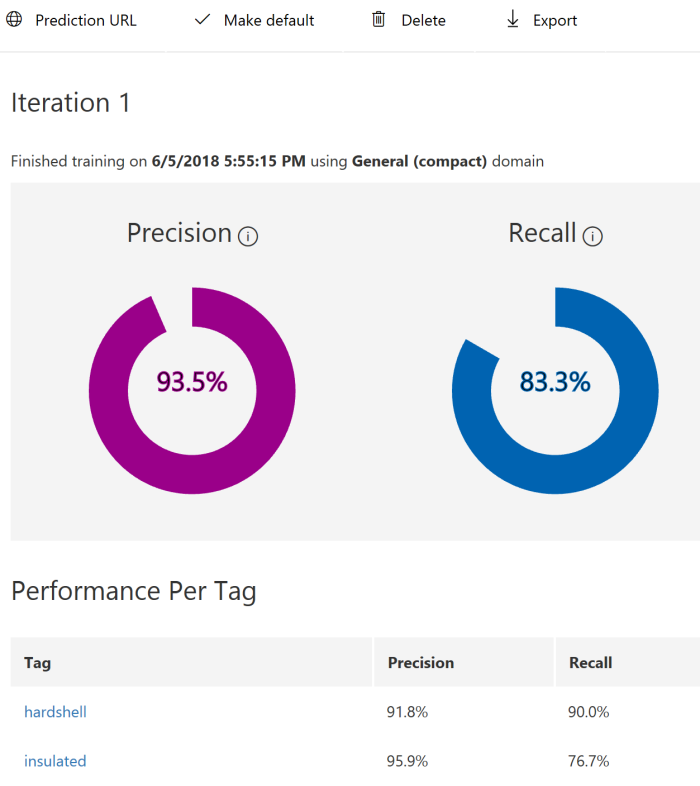
To train a custom vision model you just need to click the Train button. I got good enough results even on the first iteration:
Now, it’s possible to export model. The Custom Vision service supports several formats for the model including ONNX one:

Once model is exported we can start developing a new UWP application. Don’t forget to make sure that you use the latest SDK (Build 17134) to create the application. Exactly this release contains Windows ML implementation. It’s still in preview, but you should not install anything to see integration with ONNX.
Once the application is created, you can add the generated ONNX model to the project. On this step Visual Studio will recognize ONNX and call mlgen tool to generate three proxy classes for your model: two classes to describe input and output data and one more to create the model itself. Probably, you will need to rename class names because mine were too long and contained lots of garbage, but it’s not a problem.
Let’s look at Input and output classes:
public sealed class JacketModelInput
{
    public VideoFrame data { get; set; }
}

public sealed class JacketModelOutput
{
    public IList<string> classLabel { get; set; }
    public IDictionary<string, float> loss { get; set; }
    public JacketModelOutput()
    {
        this.classLabel = new List<string>();
        this.loss = new Dictionary<string, float>()
        {
            { "hardshell", float.NaN },
            { "insulated", float.NaN },
        };
    }
}
You can see that to send an image to the model I need to convert it to a video frame. It’s possible to do using BitmapDecoder and SoftwareBitmap classes. The class for output data contains a Dictionary that already has two my tags from Custom Vision service. So, I can look at the dictionary and get my probabilities once a new image is evaluated.
The model class is pretty simple as well:
public sealed class JacketModel
{
    private LearningModelPreview learningModel;
    public static async Task<JacketModel> CreateModel(StorageFile file)
    {
    . . . . .
    }
    public async Task<JacketModelOutput> EvaluateAsync(JacketModelInput input)
    {
        . . . . .
    }
}
You can see that there are just two methods. The first method is static and allows you to get a file with ONNX model and create an instance of the class. The second method evaluates our data and generates result utilizing classes for input and output data.
To show how to use all these classes above I created a very basic interface with a button, image element and couple text fields, and very basic logic:
JacketModel model;

protected async override void OnNavigatedTo(NavigationEventArgs e)
{
var appInstalledFolder =
     Windows.ApplicationModel.Package.Current.InstalledLocation;
       var modelFolder=await appInstalledFolder.GetFolderAsync("Models");
       var modelFile = await modelFolder.GetFileAsync("jacket_model.onnx");
       model = await JacketModel.CreateModel(modelFile);
       base.OnNavigatedTo(e);
}

private async void Button_Click(object sender, RoutedEventArgs e)
{
       var picker=new FileOpenPicker();
       picker.FileTypeFilter.Add(".jpg");
       picker.FileTypeFilter.Add(".jpeg");
       picker.FileTypeFilter.Add(".png");
       var file = await picker.PickSingleFileAsync();
       if (file!=null)
       {
           using (IRandomAccessStream fileStream =
              await file.OpenAsync(Windows.Storage.FileAccessMode.Read))
           {
              var decoder = await BitmapDecoder.CreateAsync(fileStream);
              var software_bitmap = await decoder.GetSoftwareBitmapAsync();

              WriteableBitmap bm =
                new WriteableBitmap((int)decoder.PixelWidth,(int)decoder.PixelHeight);

              software_bitmap.CopyToBuffer(bm.PixelBuffer);
              imgFile.Source = bm;

              var frame = VideoFrame.CreateWithSoftwareBitmap(software_bitmap);
              var evalData = await model.EvaluateAsync(new JacketModelInput()
                { data = frame });
              insulated_prob.Text = (100*evalData.loss["insulated"]).ToString("N2");
              hardshell_prob.Text = (100*evalData.loss["hardshell"]).ToString("N2");
           }
       }
}
There are two methods only. OnNavigatedTo just create an instance of the model using the ONNX model file that I included to the project (I don’t know why I didn’t use StorageFile.GetFileFromApplicationUriAsync method rather than three lines of code, but this approach works as well). The second method is an event handler. Once you select an image, it will be read to a SoftwareBitmap instance and the last one will be converted to a VideoFrame.
Done!
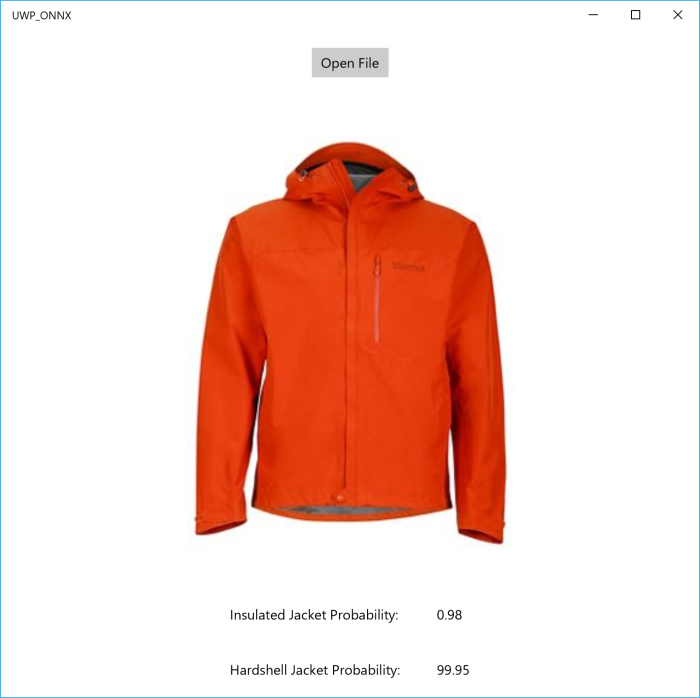
The final interface looks like this one:
So, thanks to ONNX and Windows ML we can create applications that use Machine Learning power on the edge.


Leave a comment