Archive for the ‘Unity 3D’ Category
Visual Studio Tools for Unity
Lots of developers use Visual Studio like the default code editor for Unity engine for many years and looks like, since Visual Studio 2015 release, integration between both products are stronger than before. Since Unity3D 5.2, Visual Studio Community Edition 2015 is the default Unity3D code editor for developers on Windows.
First of all, both tools have cross-product installations. If you have fresh PC with Visual Studio 2015 installed you can find that New Project dialog contains a new category there – Game. You cannot use this category to create new projects because there are just links to some popular gaming frameworks including Unity.
Selecting Install Unity, Visual Studio will help you to install Unity and Visual Studio Tools for Unity:
In case of Unity installer, integration even much better: users can select and install Visual Studio Community Edition directly from Unity installer:
Pay special attention that starting with Visual Studio Community Edition announcement, game developers can use all important Visual Studio features for free including extensions (plug-ins) and debug features. If you want to download VS Community Edition separately, you can do it visiting https://www.visualstudio.com/ web site.
Visual Studio Community Edition has some licensing limitations. For example, you can use it for small teams only (up to 5 people) but if you work in a big company you can use Professional or Enterprise version of Visual Studio. In this case Unity installer will recognize existing version of Visual Studio and propose to install Visual Studio Tools for Unity only that is a bridge between Unity and Visual Studio 2015:
So, using Unity installer or Visual Studio, it’s really hard to miss installation opportunity for Microsoft Visual Studio Tools for Unity. Let’s see how to use the tools themselves.
The good news that Unity3D 5.2 has native support for Visual Studio Tools. So, you should not add any packages or something like before. So, you simply need to create a new project or open existing one. To make sure that Visual Studio is the default editor you can call Edit->Preferences menu item and open Unity Preferences window that contains information about external tools including script editor:
On this step you can start working with your Unity project, create scripts in C#, objects, assets etc. Once you want to open the project in Visual Studio you simply need to use Open in C# menu item.
It’s easy to do and Unity will open your project in Visual Studio. Let’s look at some important features that you can use there.
First of all you can use Unity Project Explorer (Shift+Alt+E):
This window is similar to Project window in Unity and can present project’s files in the same way. So, if you need to find some files very quickly you can use the same way like in Unity. Unity Project Explorer and Solution Explorer show project’s files in different ways. Especially you can see that difference for large projects.
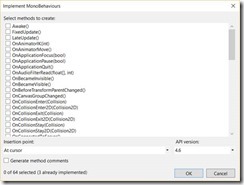
The next two windows allows you to override MonoBehaviour class methods very quickly. You can use Ctrl+Shift+Q combinations to call Quick MonoBehaviours window. Just start typing name of the method and the window will help to select the right one:
The second window you can call using Ctrl+Shift+M combination:
Using MonoBehaviour wizard you can generate several method stubs at once.
Two more features of Visual Studio Tools for Unity is supporting shaders editing and integration with Unity output. Thanks to the first feature you can see coloring syntaxes and formatting features if you are working with shaders in Visual Studio. The second feature allows you to see Unity errors and warnings in Visual Studio error window.
Finally, the most important feature there is Debugging. You can connect to Unity Debugger using Debug -> Attach Unity Debugger menu item. Select Unity Instance window will show available Unity instances and you can select any of them:
Or you can simply click Attach to Unity button on Standard toolbar.
Once Visual Studio is connected, you can open Unity editor and use Play/Stop features. Of course, Visual Studio supports breakpoints, allows to evaluate expressions and variables and other debugging features.
Try to use Kinect with Unity 5
During Global Developer Conference there were many announcements like Unity 5 availability for free. Of course, Unity has been offering a free version of the editor for many years but it was an editor without many important features. For example it was not possible to use external libraries in free version of the editor. It was the main stopper for many educational projects like projects related to Kinect. From one side we have a very cool solution like Kinect, which researches can use in many interesting projects but from other side, it’s very hard to develop something using DirectX directly. Unity might save the situation but Kinect SDK worked with Pro version only.
But Unity decided to change business model and announced that since Unity 5 there is Personal Edition, which contains all features.
Of course, I decided to return to my projects with Kinect and tried to rebuild some of them using the Unity 5 Personal. And there is great news – everything works fine! So the last stopper was broken and today you can try to use Kinect and Unity for free.
If you are interested in the topic I would recommend to use my previous article about Kinect as an instruction how to start.
Kinect 2 and Unity 3D: How to…
In one of my earlier posts I already told about my first experience in Kinect and Unity integration. But at that time I was able to download only the beta version of the package, which didn’t support Face, Face HD and Fusion APIs there. Today, we have access to a release version of Kinect for Windows SDK 2.0 as well as access to Unity Pro packages and if you want to download them right now, you can find all needed links here http://www.microsoft.com/en-us/kinectforwindows/develop/downloads-docs.aspx.
Of course, you still need a Unity Pro for Kinect functionality but if you want to test some features right now, it’s easy to activate 30-days trial version of Unity Pro. It should be enough in order to understand some features of the Kinect as well as to decide if you want to start a business right now.
So, if you already downloaded the Unity Pro package, you could notice that it contains three packages inside (.unitypackage files). The first file Kinect.2.0.1410.19000.unitypackage contains base functionality of Kinect SDK for Unity. It will allow to track bodies, leans, colors and so on. But if you want to use functionality, which relates to face (emotions, face HD tracking etc.) you will need the second package – Kinect.Face.2.0.1410.19000.unitypackage. The last package contains API which will help to use data from Visual Gesture Builder in order to simplify a way to understand predefined gestures.
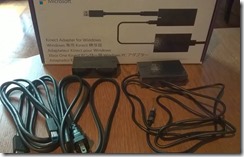
Before I start to create some code, I want to drag your attention to the hardware part. In order to start working with Kinect 2 SDK you need a Kinect 2 sensor. I know that the last sentence looks stupid but it’s realityJ I just found in Microsoft Store that Kinect 2 for Windows costs around 200 dollars – it’s very expensive, if you just want to test something. But Microsoft announced a solution of this problem as well. If you have Kinect for Xbox One, you will able to buy a special Kinect adapter for Windows, which will allow you to connect existing sensor to PC. The adapter costs around 50 dollars, which is much cheaper than a new Kinect sensor. Because I already have Xbox One, I decided to buy adapter only.
The adapter has a pretty big box, because it’s not just connector to USB. In general, Kinect requires more power than USB can provide, so the adapter allows to connect Kinect to power as well.
Because we already discussed some hardware questions I want to point to some additional requirements there. In order to build something with Kinect you will need to have Windows 8 (x64) operation system, USB 3.0 host controller and DirectX 11 capable graphics adapter.
Finally, we finished with hardware, so let’s create some code.
Let’s start with simple example where we will make some manipulation with cube using the base API. In order to do it I created a new Unity Pro project and imported Kinect.2.0.1410.19000.unitypackage there. Let’s put a cube in front of camera and create a script, which should be associated with the cube. We are going to do all work inside that script.
First of all we need to create some data fields in our class:
private KinectSensor _Sensor;
private BodyFrameReader _Reader;
private Body[] _Data = null;
We are going to use KinectSensor in order to access to Kinect. KinectSensor class provides some properties, which allows us to get sources’ references. Kinect supports several sources:
· BodyFrameSource – provides basic information about tracked people (up to 6) like skeleton information, leans, hand states etc.;
· AudioSource – allows to track a sound source from a specific direction;
· BodyIndexFrameSource – shows if a particular pixel relates to body or to background;
· ColorFrameSource – gets a copy of video image, which Kinect got from the camera;
· DepthFrameSource – each pixel of this frame represents a distance between Kinect and tracked objects (up to 4.5 meters);
· InfraredFrameSource – supports black and white frame, which looks good with any sources of lights;
· LongExposureInfraredFrameSource – looks like infrared frame but it supports better quality with less noise. It requires a longer period of time in order to get data;
All of these properties support OpenReader method, which returns the appropriate reader. KinectSensor also supports OpenMultiSourceFrameReader, which allows to get data from several readers just using a single line of code.
Since we need to know basic body movements only, we will use just BodyFrameReader. Additionally, we need an array of Body class in order to store current information about the body.
Right now we are ready to write some initialization methods. Unity supports Start method for MonoBehaviour classes in order to provide a place for initialization. We will use this method to prepare out Kinect and reader.
void Start ()
{
    _Sensor = KinectSensor.GetDefault();

    if (_Sensor != null)
    {
        _Reader = _Sensor.BodyFrameSource.OpenReader();

        if (!_Sensor.IsOpen)
        {
            _Sensor.Open();
        }
    }
}
In the previous post about Kinect I created bad code and forgot to dispose my objects. It worked fine there but if you make the same mistake here you will be able to get data from Kinect just for the first launch of your game inside Unity. After it you will not able to get any data as well as exceptions or something like it. So, in order to avoid having to restart Unity every time when you launch your application inside, we should include OnApplicationQuit method as well. We will call Dispose method for our objects there.
void OnApplicationQuit()
{
    if (_Reader != null)
    {
        _Reader.Dispose();
        _Reader = null;
    }

    if (_Sensor != null)
    {
        if (_Sensor.IsOpen)
        {
            _Sensor.Close();
        }
        _Sensor = null;
    }
}
Right now we are ready to implement Update method, which will be called on each frame update. This method will contain less Kinect related code. We need to get last frame using AcquireLatestFrame method and, in case if frame exists, we need to initialize Body array. Because Kinect supports up to 6 bodies, we need to create array based on this number but BodyFrameSource supports BodyCount property as well.
Please, don’t forget to dispose frame right after initialization of Body array.
Additionally, we should understand if at least one body was tracked. In order to do it we may use IsTracked property in Body class. If at least one body is tracked we will use its index in order to start moving our cube. Here is my version of the Update method:
void Update()
{
    if (_Reader != null)
    {
        var frame = _Reader.AcquireLatestFrame();

        if (frame != null)
        {
            if (_Data == null)
            {
                _Data = new Body[_Sensor.BodyFrameSource.BodyCount];
            }

            frame.GetAndRefreshBodyData(_Data);

            frame.Dispose();
            frame = null;

            int idx = -1;
            for (int i = 0; i < _Sensor.BodyFrameSource.BodyCount; i++)
            {
                if (_Data[i].IsTracked)
                {
                    idx = i;
                }
            }
            if (idx>-1)
            {
                if (_Data[idx].HandRightState != HandState.Closed)
                {
                    horizontal =
                        (float)(_Data[idx].Joints[JointType.HandRight].Position.X
                        * 0.1);
                    vertical =
                        (float)(_Data[idx].Joints[JointType.HandRight].Position.Y
                        * 0.1);

                    if (firstdeep == -1)
                    {
                        firstdeep =
                            (float)(_Data[idx].Joints[JointType.HandRight].Position.Z
                            * 0.1);
                    }
                    deep =
                        (float)(_Data[idx].Joints[JointType.HandRight].Position.Z
                        * 0.1) - firstdeep;

                    this.gameObject.transform.position = new Vector3(
                        this.gameObject.transform.position.x + horizontal,
                        this.gameObject.transform.position.y + vertical,
                        this.transform.position.z + deep);
                }
                if (_Data[idx].HandLeftState != HandState.Closed)
                {
                    angley =
                        (float)(_Data[idx].Joints[JointType.HandLeft].Position.X );
                    anglex =
                        (float)(_Data[idx].Joints[JointType.HandLeft].Position.Y);
                    anglez =
                        (float)(_Data[idx].Joints[JointType.HandLeft].Position.Z);

                    this.gameObject.transform.rotation =
                        Quaternion.Euler(
                        this.gameObject.transform.rotation.x+anglex * 100,
                        this.gameObject.transform.rotation.y+angley * 100,
                        this.gameObject.transform.rotation.z+anglez * 100);
                }
            }
        }
    }
}
As you can see, I used HandLeftState and HandRightState in order to change properties of cube. User will be able to “close” his hand in order to avoid cube movement. In order to use z axis I initialize deep variable in current position of user’s hand by z because the axis shows distance between Kinect and user’s hand. But thanks to that initialization I am able to move cube backward or forward by z.
Next time we will create more advanced examples based on DepthFrameSource and AudioSource.
Kinect, Unity 3D and Debugging
In this article, I was planning to make additional investigation of Kinect 2.0 SDK but I found a better theme – Debugging of Unity 3D applications using Visual Studio. Because I am not a professional developer in Unity 3D yet, I never thought about debugging of Unity 3D applications. But in the last article, I wrote about my first experience in Kinect and Unity integration and, frankly speaking, I had a headache during preparation of my demo. It happened due to the lack of ability to debug my demo scripts. Of course, Kinect 2 SDK was new for me, so I used many Debug.Log methods in order to understand what was happening with my variables.
I know that Mono Develop allows to debug Unity scripts but I don’t like this tool. So, I did not debug my scripts for some time and returned to this idea only two days ago. I was very surprised that there is an easy way to enable Debugging tools in Visual Studio. In order to do it you need to download and install Visual Studio Tools for Unity.
These tools were created by SyntaxTree team, which was bought by Microsoft in June-July this year. At once Microsoft announced availability of the tools for all developers for free and the first Microsoft version of them was presented in the end of July. The tools are integrated with Visual Studio 2010, 2012 and 2013 versions, so you can use them with older version of Visual Studio.
I have Visual Studio 2013, so I simply installed the package and enabled debugging in my project.
In order to enable debugging in an existing project you need to import package to it. If you install the tools successfully, you will find a new menu item there.
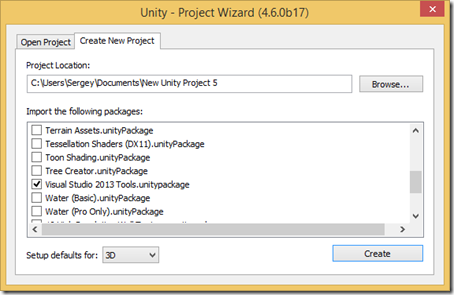
If you create a new project you will be able to add the package right in Create New Project dialog.
The package will add some scripts to your project, which will extend your standard menu. Additionally, the package contains some components that will support communication channel between Visual Studio and Unity.
In my case, I imported the package successfully, so I opened project in Visual Studio in order to start debugging. It was pretty simple, I just put some breakpoints there and clicked the F5 hot key in order to start debugging. Visual Studio switched to the Debug mode and I returned to Unity in order to start my application there. After that, I just clicked Start button in Unity and, finally, I was moved to Visual Studio in order to see a fired breakpoint.
You will be able to click and unclick Play (Pause) button as many time as you want. It will restart your game or just pause it but it will not affect Visual Studio which will stay in the Debug mode. If you want to exit the Debug mode in Visual Studio, you should just click Stop Debugging there.
To summarize, I spent a minute but I got a very powerful tool for my future Unity projects.


