Archive for June 2018
Windows ML: using ONNX models on the edge
Source Code for this example is available on GitHub: https://github.com/sbaidachni/uwp_onnx_example
Open Neural Network Exchange (ONNX) is a new open-source project that should help people to use neural network models across different machine learning frameworks. Microsoft started to talk about ONNX just last October, but frameworks like CNTK, Caffe2, PyTorch already support it and there are lots of converters for existing models including a converter for TensorFlow. Additionally, Microsoft included ONNX support to Universal Windows Platform, and it’s exactly that what I am going to discuss today.
To create a basic UWP application I need a model first. It’s possible to download an existing ONNX model from the following repository, but I decided to train my own model. Right now, we are doing a series of Machine Learning OpenHacks where people have to pass some challenges and learn lots of stuff about different machine learnings frameworks and algorithms. The simplest challenge in the list is creating a classification model using Microsoft Custom Vision Cognitive Service. Usually cognitive services don’t allow you to download your trained models, but Custom Vision does!
If you want to create an exportable model the Custom Vision service provides three options that are marked as compact. For my experiment I selected just General one:

Our OpenHack dataset contains thousand images, but Custom Vision can be trained even if you have just 5 images per category. I picked two categories from the dataset: hardshell jackets and insulated jackets and uploaded 60 images per category. If you want to create a model yourself, you will be able to find all initial images on github.
To train a custom vision model you just need to click the Train button. I got good enough results even on the first iteration:
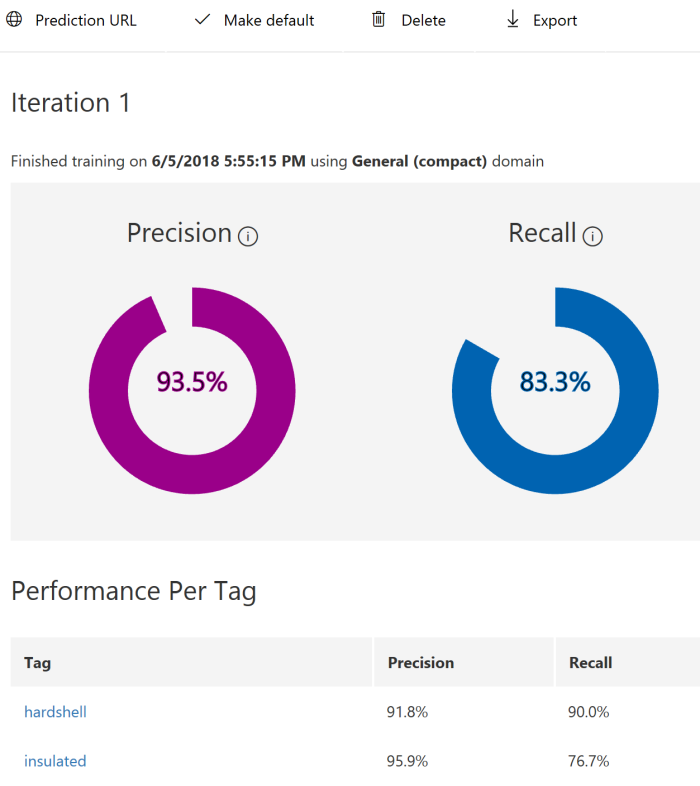
Now, it’s possible to export model. The Custom Vision service supports several formats for the model including ONNX one:

Once model is exported we can start developing a new UWP application. Don’t forget to make sure that you use the latest SDK (Build 17134) to create the application. Exactly this release contains Windows ML implementation. It’s still in preview, but you should not install anything to see integration with ONNX.
Once the application is created, you can add the generated ONNX model to the project. On this step Visual Studio will recognize ONNX and call mlgen tool to generate three proxy classes for your model: two classes to describe input and output data and one more to create the model itself. Probably, you will need to rename class names because mine were too long and contained lots of garbage, but it’s not a problem.
Let’s look at Input and output classes:
public sealed class JacketModelInput
{
    public VideoFrame data { get; set; }
}

public sealed class JacketModelOutput
{
    public IList<string> classLabel { get; set; }
    public IDictionary<string, float> loss { get; set; }
    public JacketModelOutput()
    {
        this.classLabel = new List<string>();
        this.loss = new Dictionary<string, float>()
        {
            { "hardshell", float.NaN },
            { "insulated", float.NaN },
        };
    }
}
You can see that to send an image to the model I need to convert it to a video frame. It’s possible to do using BitmapDecoder and SoftwareBitmap classes. The class for output data contains a Dictionary that already has two my tags from Custom Vision service. So, I can look at the dictionary and get my probabilities once a new image is evaluated.
The model class is pretty simple as well:
public sealed class JacketModel
{
    private LearningModelPreview learningModel;
    public static async Task<JacketModel> CreateModel(StorageFile file)
    {
    . . . . .
    }
    public async Task<JacketModelOutput> EvaluateAsync(JacketModelInput input)
    {
        . . . . .
    }
}
You can see that there are just two methods. The first method is static and allows you to get a file with ONNX model and create an instance of the class. The second method evaluates our data and generates result utilizing classes for input and output data.
To show how to use all these classes above I created a very basic interface with a button, image element and couple text fields, and very basic logic:
JacketModel model;

protected async override void OnNavigatedTo(NavigationEventArgs e)
{
var appInstalledFolder =
     Windows.ApplicationModel.Package.Current.InstalledLocation;
       var modelFolder=await appInstalledFolder.GetFolderAsync("Models");
       var modelFile = await modelFolder.GetFileAsync("jacket_model.onnx");
       model = await JacketModel.CreateModel(modelFile);
       base.OnNavigatedTo(e);
}

private async void Button_Click(object sender, RoutedEventArgs e)
{
       var picker=new FileOpenPicker();
       picker.FileTypeFilter.Add(".jpg");
       picker.FileTypeFilter.Add(".jpeg");
       picker.FileTypeFilter.Add(".png");
       var file = await picker.PickSingleFileAsync();
       if (file!=null)
       {
           using (IRandomAccessStream fileStream =
              await file.OpenAsync(Windows.Storage.FileAccessMode.Read))
           {
              var decoder = await BitmapDecoder.CreateAsync(fileStream);
              var software_bitmap = await decoder.GetSoftwareBitmapAsync();

              WriteableBitmap bm =
                new WriteableBitmap((int)decoder.PixelWidth,(int)decoder.PixelHeight);

              software_bitmap.CopyToBuffer(bm.PixelBuffer);
              imgFile.Source = bm;

              var frame = VideoFrame.CreateWithSoftwareBitmap(software_bitmap);
              var evalData = await model.EvaluateAsync(new JacketModelInput()
                { data = frame });
              insulated_prob.Text = (100*evalData.loss["insulated"]).ToString("N2");
              hardshell_prob.Text = (100*evalData.loss["hardshell"]).ToString("N2");
           }
       }
}
There are two methods only. OnNavigatedTo just create an instance of the model using the ONNX model file that I included to the project (I don’t know why I didn’t use StorageFile.GetFileFromApplicationUriAsync method rather than three lines of code, but this approach works as well). The second method is an event handler. Once you select an image, it will be read to a SoftwareBitmap instance and the last one will be converted to a VideoFrame.
Done!
The final interface looks like this one:
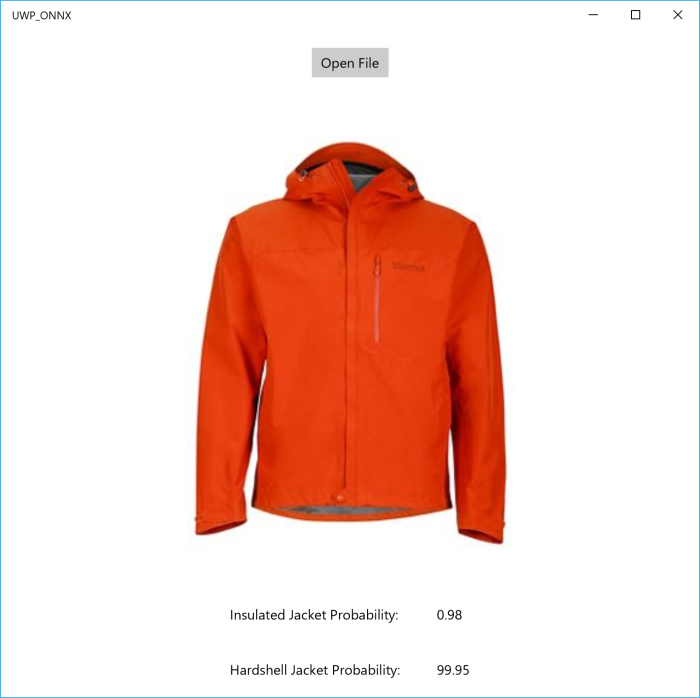
So, thanks to ONNX and Windows ML we can create applications that use Machine Learning power on the edge.
Detecting objects using Custom Vision service
Last year, I had a chance to participate in a project that we developed together with InDro Robotics team. Our primary goal was to build a machine learning solution that could be used to rescue people on the water. Just imagine an army of drones that can fly under the ocean and notify the rescue service once any issue is recognized. You can find more details about the project in the following articles:
https://blogs.technet.microsoft.com/canitpro/2017/05/10/teaching-drones-to-aid-search-and-rescue-efforts-via-cognitive-services/
https://enterprise.microsoft.com/en-ca/customer-story/industries/public-sector/public-safety-national-security/indro-robotics-revolutionizes-search-rescue/
Working at this project we could build our own model using [CNTK] (https://www.microsoft.com/en-us/cognitive-toolkit/) as well as use a private preview of Custom Vision cognitive service that was moved to public preview shortly after we finish our project.
At that time the Custom Vision service could just classify images rather than detect or identify a particular object. Additionally, there were some requirements regarding to image background and the object appearance, but we found that the service worked pretty well in a “closed” environment like ocean where we have the same background. It could classify images even better than our custom model.
The most important challenge there was inability to build custom rules using the service. For example, the service could return that there is a life-vest and a boat on an image, but it was not clear if we have a life-vest on the boat or in the water. In the first case there is nothing strange, but the second one requires an operator attention (probably, something happened to the boat and people are floating around – you might watch Titanic to encourage your imagination there😊).
But it was exactly one year ago. Since that time Microsoft added some cool features to the service including object detection features. So, I decided to find some images from our InDro project and see how it works.
To start working with Custom Vision service you need to login to https://www.customvision.ai portal and sign-in using any Microsoft ID account. No Azure Trial or credit card are required – just login and start create a new project.
Custom Vision supports great API and some SDKs for different programming languages. For example, there is C# and Python tutorials that you can use to create a project, upload images, train your model and make predictions programmatically, but for this short experiment I decided to use just the portal. So, to create a project just click New Project button and activate the dialog below:

If you already have experience with Custom Vision, you will be able to see a new option Object Detection there. It’s exactly what we need to use: just choose Object Detection and upload some images using interface.
Because we are not classifying images anymore but detecting particular objects we need to provide more information about our objects tagging them. It’s possible to do directly on the portal. You can filter all untagged images and provide tags one by one:
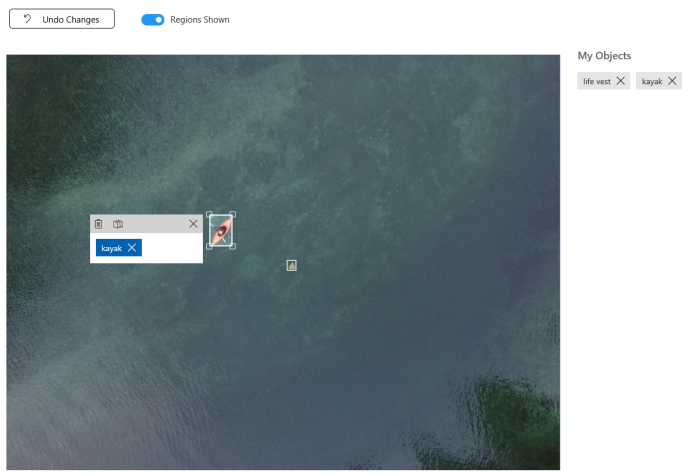
This is the most complex step, but the Custom Vision service can start building a model once you have at least 15 tagged objects per tag. So, you can use few images only.
In my case, I uploaded 28 images with 25 kayaks and 17 life-vests there. I had much more images (of course, more is better), but I wanted to see results for a small subset. So, I clicked Train button and got my model in 60 seconds. The result is very surprised me:
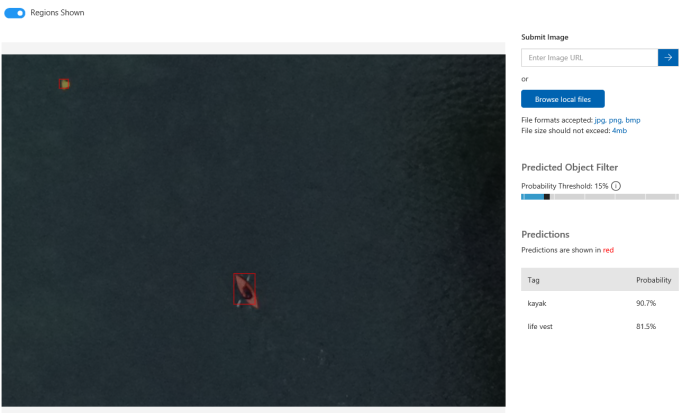
I even could find a life-vest that I could not recognize like a life-vest myself:

Of course, there are some room for improvement. For example, you can upload more images per tag as well as answer some questions like if you want to recognize a life-vest that is on a person who is sitting in a kayak. But even on the first iteration the service produces good results and you should not be an expert in Machine Learning.
One more thing that I want to note is how to start working with Custom Vision programmatically. In the beginning I mentioned couple tutorials, but all of them assume that you already have prepared images with marked boxes. So, you need a tool that helps you generate your dataset in the right format. And there is a tool: https://github.com/Microsoft/VoTT. Initially this tool was built for CNTK, but now it supports YOLO format, TensorFlow Pascal VOC and Custom Vision. In the case of Custom Vision, the tool will create a new project and upload all images, tags and boxes there.
Pay attention that for Custom Vision export you need to provide a training key rather than a directory:

Your training and prediction keys are available on customvision.ai. Just click the Settings button in top-right corner of the portal.
If you want to use existing project some JavaScript coding skills are required. The Visual Object Tagging Tool is open source. So, you can simply find the following file lib/detection_algorithms/custom_vision/exporter.js and modify it a little bit (check vott_export name and tag creation procedure).
Using ML.NET to have a safe trip on Titanic
GitHub url: https://github.com/sbaidachni/MLNETTitanic
Couple years ago, I participated in a series of events for students, where we made some demos about Machine Learning Studio. The centerpiece of the demo was a model that could help make prediction about your chance to survive on Titanic. The datasets to build the model are still available on Kaggle, and you can download them using the following link: DataSets. That’s why, when Microsoft announced a new machine learning library for .NET developers, I decided to start playing with it using exactly the Titanic datasets. Let’s do it together.
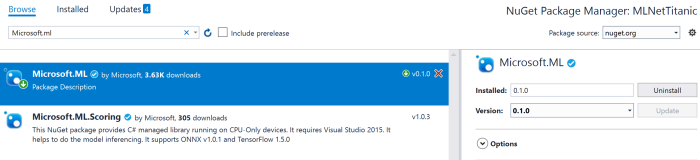
ML.NET is an open-source and cross-platform framework for .NET developers. It means that you can use it on Windows, Mac, Linux platforms utilizing .NET Core power, but it should also work on .NET Framework. For my demo I am going to use exactly .NET Framework, because I found that package installation is more challenging there compare to .NET Core. So, let’s create a basic Console application and use NuGet package manager to add Microsoft.ML package to the project:
I am going to use the latest stable release to simplify my post, but you can clone GitHub repository and build all needed assemblies from the source. I would recommend to use this approach if you want to get access to all new features. Looks like that many developers are contributing to the project right now to make a product that is too close to Microsoft internal machine learning library. For example, the current version (0.1.0) doesn’t allow you to split a dataset for training/testing parts and integrate it to a pipeline. It’s possible to split, but you need to go one level down rather than use high level Pipeline API. At the same time, if you compile the latest version of the library you will be able to see that there is an improvement regarding to cross-validation in the pipeline that is implemented already and it should be available in the [next release] (https://github.com/dotnet/machinelearning/issues/6).
Adding the Microsoft.ML package to .NET Framework project you will need to make sure that your current platform is 64-bits. ML.NET doesn’t work on 32-bits (at least, right now), and to avoid any issues you can use Project Properties (Build tab) to choose the platform explicitly:

Working in .NET Framework environment I found couple small issues (not reproduced for .NET Core). The first one is System.ValueTuple assembly that was included to my project, but for .NET Framework 4.7.1 projects all tuple related functionality already included to mscorlib. So, if you use tuples, you will need to remove this library manually. The second problem is related to two native libraries CpuMathNative.dll and FastTreeNative.dll. Both libraries were copied to my solution folder, but Visual Studio cannot see them by default. The simplest way to fix the problem (you will have a runtime exception) is just copied both libraries to bin folder with your application. If you create .NET Core application rather than .NET framework it just works without modifications above.
Finally, we need to prepare train and test datasets. You need to download just train.csv dataset from Kaggle. They have test.csv, but this dataset doesn’t contain labels and should be used to participate in Kaggle competition (to predict labels using your model and send results to Kaggle). So, we will need to split train.csv to have some data for evaluation. As I mentioned earlier, splitting is not integrated with pipeline in 0.1 version. So, I use a simple R script to make this task (included to the solution as a separate project). Once you have train/test sets you can place them anywhere and use absolute paths or include them to the project. If you included the sets to the project, don’t forget to change file properties to copy both of them to your application folder:

Ok. Let’s start coding.
ML.NET contains the TextLoader class that allows you to read data from csv files. But it’s not just a stupid text reader. Thanks to TextLoader you can make conversion, rename columns and drop some of them on fly. The Titanic dataset contains 12 columns (their descriptions on Kaggle) and I strongly believe that PassengerId and Name columns cannot affect my model. The PassengerId column is just a row number in our dataset. Obviously, this number in our dataset would not help people to survive. Name doesn’t help to survive as well. So, I decided to drop these columns since the beginning. At the same time the dataset contains a very important column called Survived. This is our label, and I need to rename it to Label, because Label and Features are default names for ML.NET pipeline. In order to describe all these changes to TextLoader, we need to define a class. Below you can find an example of this class:
public class Passenger
{
    [Column(ordinal:"1", name:"Label")]
    public bool Survived;

    [Column(ordinal: "2")]
    public float Pclass;

    [Column(ordinal: "4")]
    public string Sex;

    [Column(ordinal: "5")]
    public float Age;

    [Column(ordinal: "6")]
    public float SibSp;

    [Column(ordinal: "7")]
    public float Parch;

    [Column(ordinal: "8")]
    public string Ticket;

    [Column(ordinal: "9")]
    public float Fare;

    [Column(ordinal: "10")]
    public string Cabin;

    [Column(ordinal: "11")]
    public string Embarked;
}

public class PredictedData
{
    [ColumnName("PredictedLabel")]
    public bool IsSurvived;
}
You can see that there is the Column attribute that allows us to define the column name and specify its position in the dataset. There are three data types: bool, string and float. Potentially, I could use int for some columns, but ML.NET doesn’t support this data type now.
One more class that I defined above is PredictedData. This is a container that we are going to use making prediction. In our case we have just two-class classification task. So, I could use bool. Additionally, I applied the ColumnName attribute to make sure that ML.NET will recognize the field to store predicted values.
Before to start training our model we need to prepare data first like clean missing values, convert string columns to numeric vectors and so on. What is more important, once you train your model on your prepared data, you will need to do the same transformations with testing dataset and all data that you are using to make predictions. That’s why modern frameworks allow developers to combine a model parameters and pipeline information inside the model. Using this approach you can load the model, pass initial data and the model will preprocess them “automatically” before make prediction. To build own pipeline in ML.NET we can use the LearningPipeline class.
var pipeline = new LearningPipeline();
This class allows us to combine all preprocessing steps prior the training and include all these steps to the model. Below you can find and example of a pipeline for our dataset:
pipeline.Add(new TextLoader(trainSetPath, useHeader: true, separator: ","));

pipeline.Add(new ColumnDropper() {Column=new string[] {"Cabin","Ticket"} });

pipeline.Add(new MissingValueSubstitutor(new string[] { "Age" })
    { ReplacementKind=NAReplaceTransformReplacementKind.Mean });

pipeline.Add(new CategoricalOneHotVectorizer("Sex", "Embarked"));

pipeline.Add(new ColumnConcatenator(
    "Features", "Age","Pclass", "SibSp","Parch","Sex","Embarked"));

pipeline.Add(new FastTreeBinaryClassifier());
You can see that we need to start with a TextLoader to have some data for preprocessing and training. After that I decided to drop two more columns to save some space in computer memory. Both columns Cabin and Tickets contain some random text and I don’t have any ideas how to utilize these fields.
Right after that I decided to clean Age field. This column contains many missing values, but it’s not wisely to drop all rows where Age is missing, because I will not have enough data to train/test my model. So, I replace all missing values with mean. You can drop this column at all and see difference.
One more step is converting text categorical fields to one hot numeric vectors. I used CategoricalOneHotVectorizer and added it to the pipeline.
Finally, we need to concatenate all numeric columns to just one called Features. It’s a default name like Label. Once it’s done I can add a classifier. In this case I used fast tree, but there are couple more to make some experiments.
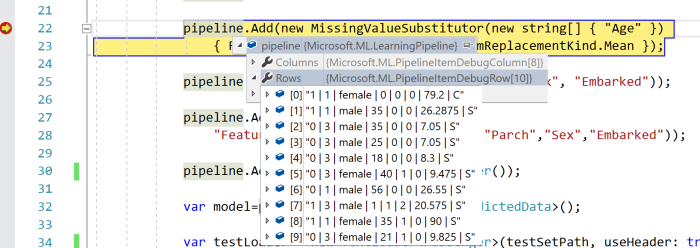
The LearningPipeline class is optimized for debugging, and if you run the code above, you will be able to see how your data is transforming on each step:
Now, I can train my model using defined above pipeline. This step is not challenging at all:
var model=pipeline.Train();
Once model is trained, you can save it to your disc using WriteAsync, load from the disk using LoadAsync or start making predictions using the Predict method. But I still want to evaluate my model. In order to do it we can use the BinaryClassificationEvaluator class and one more TextLoader to load our test dataset:
var testLoader = new TextLoader(testSetPath, useHeader: true, separator: ",");

var evaluator = new BinaryClassificationEvaluator();

var metrics=evaluator.Evaluate(model, testLoader);
Below you can see some data from metrics object:

So, you can see that accuracy and F1 Score is pretty good and we still have some room for improvement. For example, we can make our training using the full training dataset and use cross-validation approach for evaluation, we can provide some parameters to the classifiers, we can improve Age cleansing procedure and so on. In any case, you can see that our code is not complex at all and you can make lots of experiments just tuning parameters.
If you are interested in ML.NET, I would recommend to clone the project from GitHub to use the latest updates. Good luck with your experiments.

