Archive for the ‘Microsoft’ Category
My first experience with 3D printer
Last week, thanks to BizSpark program, finally, we got a 3D printer for the Launch Academy. Since I am a Technical Evangelist in Vancouver I got an exclusive offer to understand what is it and how can we use it for different projects. Frankly speaking we had a 3D printer in Ukrainian office but I have never touched it because in Ukraine I never had a chance to buy something, like motors and controllers at http://robotshop.ca/, Amazon or Fry’s Electronic and that printer wasn’t very valuable for me at that time. But today I need much stuff like propellers for my drone, wheels for micro robots, boxes for microcontrollers and sensors etc.
So, last Tuesday, I got a package and started my way in 3D experience. In this post I am going to share several learnings, which I got during my first steps.
It’s not very complex thing
There are several technologies, which are used in 3D printers today. For example in medicine area you can find some printers, which use powder or photopolymers and are based on Selective Laser Sintering or Stereo Lithography technologies. But today, the most common technology for innovators and hobbyists is Fused Deposition Modeling or Fused Filament Fabrication. This technology works by laying down material in layers. It can use plastic or metal to create a thing, layer by layer
In my case I have a Makerbot Mini 3D printer, which looks like a small box without any complex things inside. Because it was a new one, it required 6-9 steps in order to assemble it but I was not required to use any instruments.
3D printer is not a very complex thing in sense of software as well. It contains software, which allows to use G-Code to print your things layer by layer. In any case, before printing something, you need to update your printer. In case of Makerbot I used Makerbot Desktop tool. This tool is not just updated in (?) my printer but it’s required to load and unload filament there.
Windows 8.1 drivers
It’s very important to buy a printer, which supports drivers for Windows. Makerbot is such a printer, so it supports Plug and Play experience.
If your printer doesn’t support Windows 8.1 drivers, you will have much more steps to print your things. Usually you should convert your 3D model to STL format and use some slicer tools in order to set some settings and slice your model. Additionally, the tools should generate G-Code for the printer. But in case of Windows 8.1 compatible printers, driver can do many things for you. It allows you to use common tools for printing and you even can implement printing experience in your application. If you want to create an application, which will print something, you can download 3D printing SDK and find several examples there. You can use the following link in order to download the sdk.
Additionally, SDK contains some documents, which describe how to create your own driver. So, if you assembled your own printer or want to help the community, you can use 3D printing SDK in order to build a driver as well.
Tools
As I mentioned earlier, 3D printing SDK for Windows contains some samples about how to implement 3D printing experience in your applications. But if you are going to start printing right now you can install already prepared application for your – 3D Builder. You can find this application in the Window Store and it allows to create, modify, fix and print your models. Of course, you can use Maya or 3D Max in order to create a new model but I don’t have experience with it. So, I decided to use 3D builder.
Additionally, 3D Builder allows to use Kinect to scan real objects.
If you downloaded Makerbot desktop tool, you will find it valuable as well. Of course, it doesn’t support any features which help to modify your model but it allows to understand your printer status and estimate printing time.
Where to find some stuff
No matter what printer model you have I would like to recommend to visit site http://www.thingiverse.com/. It contains a lot of free models, which you can use for your experiments.
Usually you can find STL file there. So, you can print it directly or use them to create new models in 3D Builder.
Some tips
I found that my printer is too noisy. So, if you are going to print something at home – find a good place for it. Additionally, it requires much time to print things. For example, in order to print a trinket, it will spend more than hour but for a drone propeller it spent 3 hours.
Before starting printing, remove all garbage from the printing area. Usually you can find some filament there because it accumulated there during heating process etc. If it happened right before printing, you can use Makerbot desktop in order to pause the process. Usually, it’s not very dangerous to put your hands inside.
Use 3D builder to change orientation of your things. Sometimes your things are not stable during printing process due to wrong orientation. Think some time before starting the process.
Use raft and support features. It requires additional printing time but it’s easy to remove raft and it really helps.
Summary
3D printers are very popular today and they allow to bring your ideas to real world with less cost. Today, you can find many utilities, APIs and models, which are ready for 3D printers. At the same time, 3D printers are not very expensive like several years ago. In any case, if you still don’t have your own 3D printer, you can visit one of the place for innovators and startups – in many cases you will find many 3D printers there. And today I would like to announce 3D printer availability at Launch Academy in Vancouver.
Internet of Things: My first experience with Galileo 2 (part 1)
Published on MSDN Blog. Please, visit it for more great articles from Canadian DX team.
I didn’t feel so excited since that time, when I bought my first PC – ZX Spectrum. It was a new world, which required strong programming knowledge as well as ability to make research. And today I will open a door to one another new world, where I will try to integrate my programming knowledge with new types of hardware in order to build many new devices. Let’s begin.
First of all, in order to create a new hardware we need to buy some stuff like a board, sensors and wires. Because I have a good experience with Microsoft platform and Visual Studio, I have selected Intel Galileo 2 board, which is supported by Microsoft and it is compatible with Arduino boards, so you will able to find some stuff like sensors, shields, breadboards anywhere. At this time, I don’t have an idea about my future devices, so, I decided to buy a board as well as several starter kits. Finally, I bought my Galileo 2 board, SunFounder 37 modules Arduino Sensor Kit and Sunfounder Project Super Starter Kit.
I used Amazon in order to buy this stuff but you can use any online store. Additionally, I have visited Fry’s Electronics last week and I was too surprised that you may buy a board as well as many of these sensors and components there. There was a huge selection of kits for building own robots, sensors and wires. Probably, there is a special shop in Canada but I am a newcomer in Canada right now. So, please, recommend a good place here and it will help many Canadian developers.
Additionally, you will need a network cable, a microSD card (16 Gb should be enough) and microUSB to USB cable. The last one is used for all modern phones, so it should not be a problem but I forgot to buy a microSD, so I needed to find a nearest Staples in order to buy it. Pay special attention that in order to deploy your application, you need a network cable, which will connect your computer and your board.
Ok, right now, we have a board and some stuff, so we are ready to test the board. In order to use Windows as well as Visual Studio there, you will need to sign a special Windows Developer Program for IoT, which is available here: http://www.windowsondevices.com. You will need to use your Live ID, fill the registration form and right after your application is approved you will get access to Connect site, there you will be able to download all needed software.
In order to set up everything you will need three packages there: WIM image of the operation system, which you will deploy to your board (microSD card); apply-bootmedia.cmd file, which you will use to deploy the operation system; MSI package, which include some tools like Galileo Watcher and Visual Studio integration package.
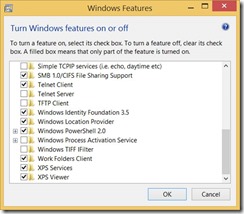
In order to setup your PC you will need to launch the MSI package and enable Telnet features there. Later we will use Telnet in order to kill processes and get some information from the board. In order to enable Telnet features just go to “Program and Features” in the “Control Panel” and call “Turn Windows Features on or off” window.
Right now it’s time to setup your board. In order to do it you need to deploy Windows image to microSD card. Apply-BootMedia.cmd is able to do it for you. Just run the following command in the Command Prompt window (with Administrator permissions):
apply-bootmedia.cmd -destination {YourSDCardDrive} -image {.wimFile} -hostname mygalileo -password admin
Your card will be ready in 2-3 minutes.
Right now, we are ready to run something on Galileo. So, put your microSD card to the slot on the board, use the network cable to connect your Galileo board and turn on your board. Pay attention that Intel provides a universal power supply unit with different connectors. So you will able to use your board anywhere despite of voltage of the local system.
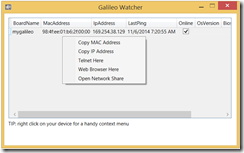
Usually it takes Galileo 2 2-3 minutes in order to start Windows there. During this process you will see blinking LED, which is marked as SD. When LED finishes blinking, your board is ready to communicate with your computer. The second way to understand that the board is ready – launch Galileo Watcher, which will show IP address of your board, MAC address, name and information about state of your board.
Using the Galileo Watcher you are able to monitor the state of your board as well as to launch some stuff like window in browser, which will show existing processes.
Pay attention that if you will use Visual Studio or Telnet in order to connect your board, you will need to provide the name and password there. We provided our password below and the default name is administrator. But, in many cases, you will need to provide the full name of the user like localhost\administrator or mygalileo\administrator, especially, if your computer is in a domain.
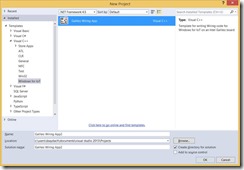
Finally, you may launch Visual Studio and create your first project for Galileo 2.
Microsoft provides a ready to go template, which we will discuss next time. Just try to start it on Galileo. If deployment is successful you will see that one more LED is blinking in infinity loop on your board.
In order to kill the process you will need to start Telnet and use the following commands:
· tlist – in order to see all existing processes
· kill <process ID> – in order to kill selected process
Probably I wrote enough for the first part. In the next article we will try to understand, what is Galileo and how to create a simple scenarios there.
Dev Center Benefits: How to join
New life – new developer account in Microsoft Store.
I just moved to Vancouver, BC, so I decided to open my own account in order to publish some Windows Phone and Windows 8 applications. Today, you can pay $20 and get unlimited account there. But from the one hand, I still don’t have a local bank account in Canada, and from the other hand I already heard about a program, which provides some benefits for new developers, who don’t have Store account yet. That’s why I decided to start with https://devcenterbenefits.windows.com/ site.
As you can see, according to the program, every developer has a chance to get many benefits from Microsoft like consulting, priority support, gift cards etc. These are very cool benefits because thanks to them, every developer has a chance to increase quality of his applications as well as get some tools for promo. Probably, later, I will share my experience about each of these benefits but right now I found that I am able to get Free Dev Center account.
Of course, I clicked “Join Now” at once and passed several registration steps there.
In the first step you need to login with existing Live ID or to create a new one.
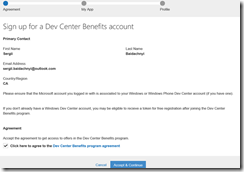
At once as you logged in, you need to accept the program agreement and click “Accept & Continue”.
In the next step you are able to submit links to your application in order to get upgrade to the next level of the Dev Benefits program. Because I just wanted to create a new account I skipped this step. You will be able to add your applications at any time, later.
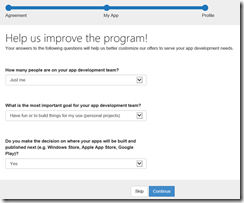
Next step allows you to help Microsoft to understand who you are and what you are going to do on Microsoft platform. You can answer these questions or just skip this step.
Finally, my Dev Benefits account was created and I got access to my offers including free developer account.
Pay special attention there that in order to redeem your registration code, you need to agree that you will publish your first application in 90 days. So, if you are not ready to build your application right now, don’t click the button. If you redeemed you code but didn’t publish the application your offer could be expired (but I didn’t have a way to check it).
Therefore, I spent about 3 minutes in order to get my registration code. Additionally, I spent 2-3 more minutes in order to create my Store account using this code. And CREDIT CARD WAS NOT REQUIRED!
Kinect, Unity 3D and Debugging
In this article, I was planning to make additional investigation of Kinect 2.0 SDK but I found a better theme – Debugging of Unity 3D applications using Visual Studio. Because I am not a professional developer in Unity 3D yet, I never thought about debugging of Unity 3D applications. But in the last article, I wrote about my first experience in Kinect and Unity integration and, frankly speaking, I had a headache during preparation of my demo. It happened due to the lack of ability to debug my demo scripts. Of course, Kinect 2 SDK was new for me, so I used many Debug.Log methods in order to understand what was happening with my variables.
I know that Mono Develop allows to debug Unity scripts but I don’t like this tool. So, I did not debug my scripts for some time and returned to this idea only two days ago. I was very surprised that there is an easy way to enable Debugging tools in Visual Studio. In order to do it you need to download and install Visual Studio Tools for Unity.
These tools were created by SyntaxTree team, which was bought by Microsoft in June-July this year. At once Microsoft announced availability of the tools for all developers for free and the first Microsoft version of them was presented in the end of July. The tools are integrated with Visual Studio 2010, 2012 and 2013 versions, so you can use them with older version of Visual Studio.
I have Visual Studio 2013, so I simply installed the package and enabled debugging in my project.
In order to enable debugging in an existing project you need to import package to it. If you install the tools successfully, you will find a new menu item there.
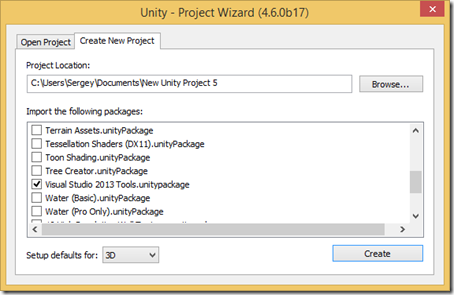
If you create a new project you will be able to add the package right in Create New Project dialog.
The package will add some scripts to your project, which will extend your standard menu. Additionally, the package contains some components that will support communication channel between Visual Studio and Unity.
In my case, I imported the package successfully, so I opened project in Visual Studio in order to start debugging. It was pretty simple, I just put some breakpoints there and clicked the F5 hot key in order to start debugging. Visual Studio switched to the Debug mode and I returned to Unity in order to start my application there. After that, I just clicked Start button in Unity and, finally, I was moved to Visual Studio in order to see a fired breakpoint.
You will be able to click and unclick Play (Pause) button as many time as you want. It will restart your game or just pause it but it will not affect Visual Studio which will stay in the Debug mode. If you want to exit the Debug mode in Visual Studio, you should just click Stop Debugging there.
To summarize, I spent a minute but I got a very powerful tool for my future Unity projects.


